One of my wonderful readers let me know that my blog was unavailable for quite a few days this week! Upon checking, I discovered that I had received a huge amount of spam comments and Blogger had pulled down the blog for me to confirm that it hadn't been infected with malware, etc. So all the recipes that were scheduled to come up....didn't. And I "lost" them. I am working to recover all the posts that are missing (from Wednesday-Friday)
We had a very busy day today. The farmer's market did great today. I had at least 5 people ask me if I could sell them some salsa!! Also, a wonderful lady told me that I should put our jars up on Etsy. Hey, that is part of my 101 in 1001. So tomorrow I will work on that along with more recipes.
On Wednesday, I went to a friend's house and taught her how to can peaches. We had 2 bushels to put up. We only got 1/2 a bushel done, then (6 quarts & 10 pints that we split) then we each had another 3/4 bushel to put up on our own. My wonderful gus knew that I've really been hurting for the past few days, so they pitched in this afternoon and we got the rest of the peaches done. 14 more quarts and 9 1/2 pints of jelly!! Yeah!
I also put another quart of salsa in the lacto-ferment jar! I still have 2 quarts of blackberries to do...and 20 pounds of zucchini...and 10 pounds of tomatoes...and a big basket of polano peppers that were gifted to me from Dragonfly Farm (at the market today).
Saturday, August 13, 2011
Lacto Fermented Green Tomato Pickles

1 wide mouth quart preserving jar
enough green tomatoes to fill the jar to 1 inch below the lid (only use tomatoes that are totally green, the ones that made you crazy at the start of the summer) I actually used green cherry tomatoes from the branches of the tomatoes plants that I needed to trim!
1 dill head or 1 fresh dill sprig or 2 Tbsp dried dill or dill seed)
1 hot pepper with the stem pulled off (optional)
1 large or 2 medium or 3 small cloves of garlic
1 Tbsp canning and pickling salt
4 Tbsp whey - I use kefir milk whey(or substitute an additional Tbsp of canning and pickling salt)
Filtered water

Wash the tomatoes and remove their stems and place in the clean wide mouth jar to 1 inch below the rim. Add the garlic, dill and hot pepper between the tomatoes and add the salt and whey, if using.
Fill the jars with water to 1 inch below the rim and screw on the airlock lid. Store at room temperature for 3-4 days (3 days when kept at 72°) before placing on the top shelf of your fridge. They can be eaten after the 3 - 4 days but are better after a month of storage. It's normal if the brine is fizzy or there is white foam floating on the top.
Fill the jars with water to 1 inch below the rim and screw on the airlock lid. Store at room temperature for 3-4 days (3 days when kept at 72°) before placing on the top shelf of your fridge. They can be eaten after the 3 - 4 days but are better after a month of storage. It's normal if the brine is fizzy or there is white foam floating on the top.
As a full disclosure thing, the green tomatoes in the photo are not fermented yet. When done they will be more of an olive green color, and the brine will be cloudy. I wanted to post this while there were still green tomatoes for people to use.
Tuesday, August 9, 2011
Corn Relish
3 cups fresh corn kernels
1 small tomato, peeled, seeded and diced
1 small onion, finely diced
1/2 pablano pepper, seeded and diced
2 tablespoons of cilantro leaves, chopped
1/4 - 1/2 teaspoon red pepper flakes
1 tablespoon sea salt
4 tablespoons whey
In a large bowl mix all ingredients. Pound lightly with a wooden pounder to release juices. Place in a quart-sized wide-mouth mason jar and press down with a pounder until juices cover the relish. The top of the vegetables should be at least 1 ince below the top of the jar. Cover tightly with airlock (filled to the line with filtered water) and keep at room temperature for about 3 days.
Monday, August 8, 2011
Lacto-fermented Sauerkraut
1 medium cabbage, cored and shredded
1 tablespoon caraway seeds
1 tablespood sea slt
4 tablespoons whey (if not available, use an additional 1 tablespoon salt
In a bowl, mix cabbage with caraway seeds, sea salt and why. Pound with a wooden pounder (we now have some of these available for sale--the wood turner at the farmer's market made some for us!!) for about 10 minutes to realease juices. Place in a quart-sized, wide-mouth mason jar and press down firmly with the pounder until juices come to the top of the cabbage. The top of the cabbage should be at least 1 ince below the top of the jar. Cover tightly with the airlock lid. Put filtered water into the airlock and keep the jar at room temperature in a dark cabinet for about 3 days. The sauerkraut may be eaten immediately, but it improves with age.
Sunday, August 7, 2011
Lacto-Fermented Salsa
4 medium tomatoes, peeled, seeded and diced (personally, I don't mind the seeds)
2 small onions, finely chopped
3/4 cup chopped chile pepper, hot or mild (I bought some beautiful pobano peppers yesterday at the farmer's market)
6-8 cloves of garlic, peeled and finely chopped (optional)
1 bunch of cilantro (I will have to use dried)
1 teaspoon of dried oregano
1 teaspoon of dried cumin
juice of 2 lemons (I prefer lime)
1 tablespoon sea salt (pickling salt or Himilayan Pink salt)
4 tablespoons of whey
1/4 filtered water
Mix all ingredients and place in a quart-sized, wide-mouth mason jar. Press down lightly with a wooden punter adding more water if necessary to cover the vegetables. The top of the ;vegetables should be at least 1 inch below the top of the jar. Cover tightly with the airlock lid. Keep at room temperature for about 2 days before tranferring to cold storage.
Pictures forthcoming...have to go and actually make it!
Saturday, August 6, 2011
Pickled Pearl Onions

For our version we filled the jar with peeled, whole white pearl onions from the farmer's market
You could use red pearl onions also.
Fill the jar to the top, leaving 1 inch head space with 6% salt water brine. Put on the airlock cap and wait.
We have also done it with cucumbers and onions (as shown on all our literature, above, and on the homepage of the www.InAPickle.homestead.com website (they look like eggs, but are actually onions).
This is a short one today because it is Saturday and Farmer's Market day!!
Friday, August 5, 2011
Lacto-fermented Beets

- naturally-grown beets – peeled, quartered and sliced
- 1 cup of pure water with 1 tablespoon of sea salt –OR– 1 cup of pure water with 1/2 tablespoon of sea salt and 4 tablespoons of homemade whey (dripped out of kefir or yogurt, or from raw cheese-making)
- additional pure water
Start by peeling, quartering and slicing the beets.
Mix the sea salt and water (and/or whey) together so the salt is mostly dissolved. If using water and sea salt, add 1 cup to each jar. If using water and sea salt with whey, add 1-1/4 cups to each jar. Then top off each jar with more pure water to cover the vegetables
Put the airlock lid onto your jar and place in a dark, room temperature place for about 3 days. Watch the bubbles and soon they will be done. Then place in your cold storage.
Thursday, August 4, 2011
Sour-Sprouts (the Wallace version of Sauerkraut)
Anyway, if you buy the beans, this is really easy. If you've eaten up your Dilly Beans, you can just put the sprouts into the same brine and spices and put the airlock on and in 3 days you will have some of the most delicious sour-sprouts. We call them this because it tastes a bit like really good sauerkraut, but they are crispier. Also, mung bean sprouts tend to have a bitter-ish taste to them. By fermenting them, it takes the bitterness out.
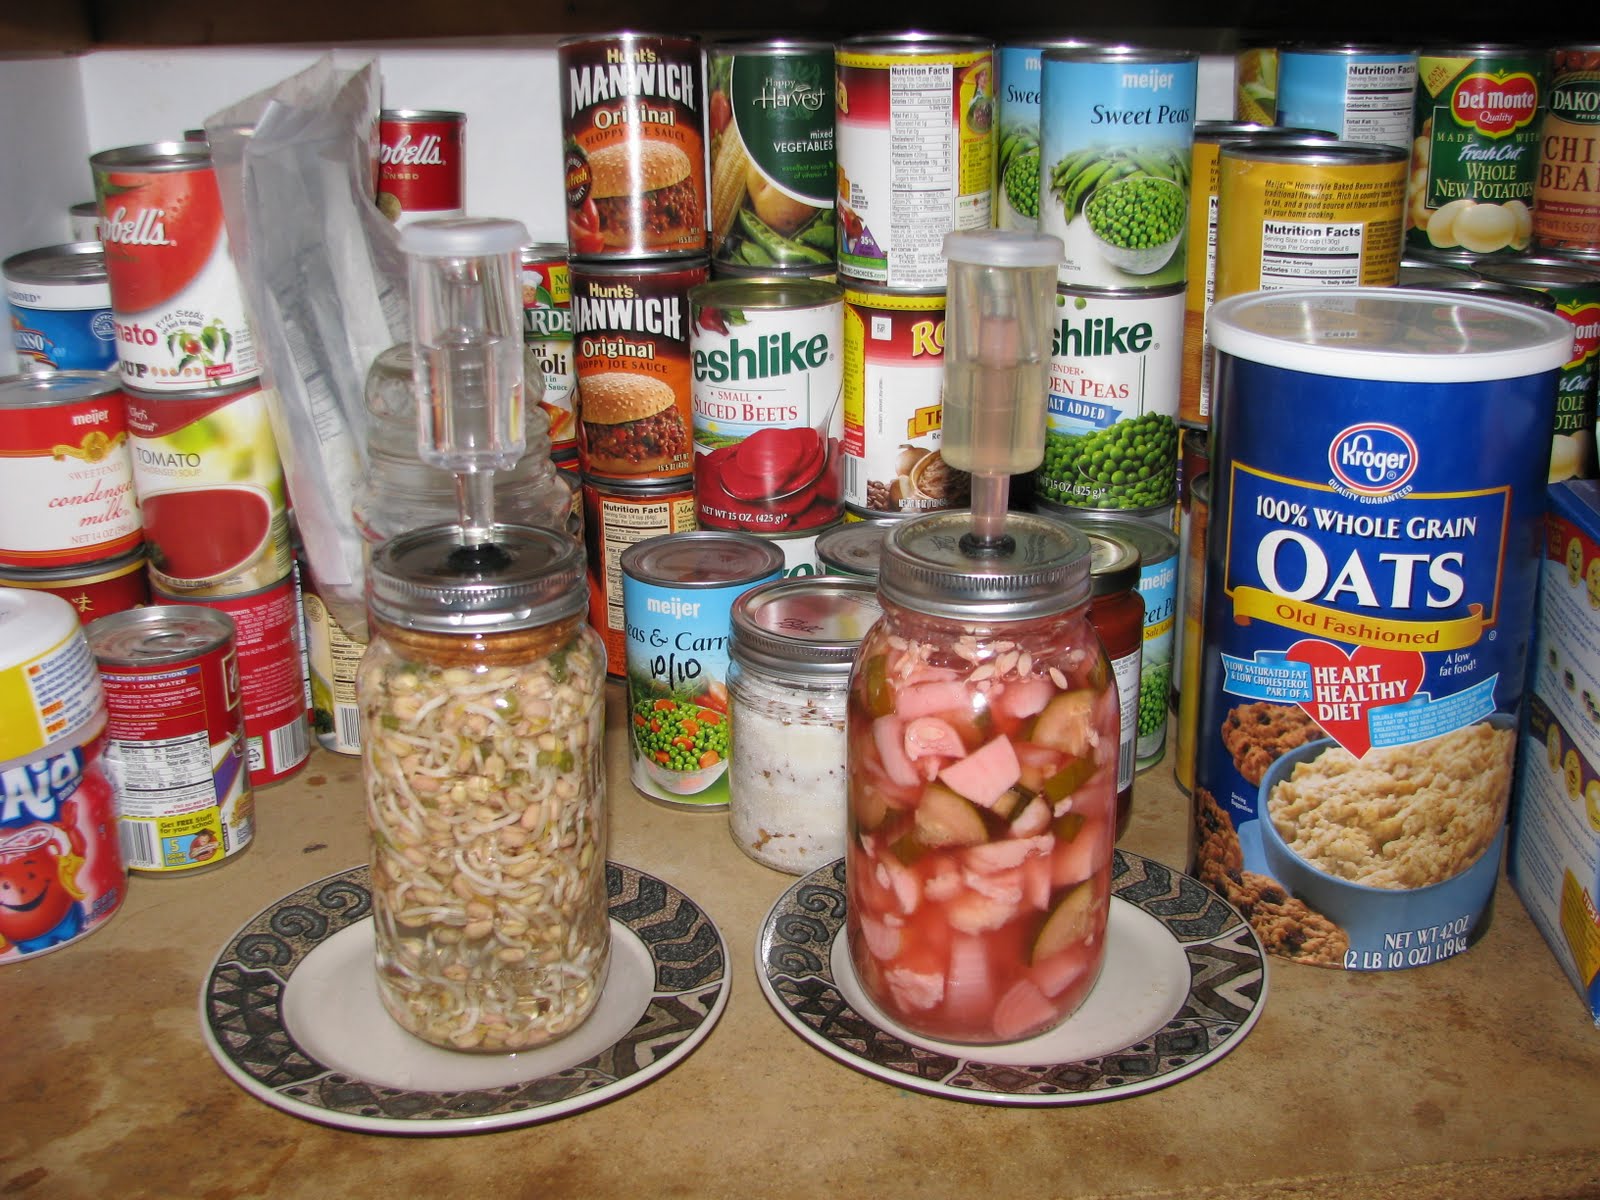 |
| Mung bean sour-sprouts and veggie medley...the radishes give it the pink color. |
Sour-Sprouts
- About 2 cups of mung bean sprouts
- 2 garlic cloves, peeled and crushed
- 2 tablespoons fresh dill, snipped
- 1 tablespoon sea salt
- 4 tablespoons whey (if not available, use an additional 1 tablespoon salt)
- 1 cup filtered water
Combine remaining ingredients and pour over the sprouts, adding more water if necessary to cover the sprouts. The top of the liquid should be at least 1 inch below the top of the jar.
Cover tightly with air-lock cap and keep and keep at room temperature and out of UV light for about 3 days before transferring to cold storage.
Wednesday, August 3, 2011
Pickled Green Beans-Our new "Chips"
These pickled green beans make a tasty snack anytime of the day…I like to grab a few straight from the jar and munch on them….betcha’ can’t eat just one --just like chips 

Place half of the sliced garlic to a clean quart-sized mason jar, followed by the red pepper flakes and dill.
Snap off the stem-end of green beans. (We've done it both ways and it works either way. I go towards the less is better...so I haven't blanched the last two batches ) Blanch green beans in boiling water for 2 minutes, then immediately transfer to a bowl of ice water until no longer hot. Drain the blanched beans well and pat dry with paper towels.
Add green beans to your jar, stem-end down, packing them close together….it helps to lay the jar on its side at first. Fill the jar completely with the green beans, but do not pack them in too tight. Sprinkle remaining garlic slices on top of beans in jar.
In a bowl, or large glass measuring cup, mix together the water and salt. Pour this mixture into your jar of beans to cover, being sure to leave 1-inch space from the top of the jar for expansion. (If the brine does not cover, simply make up another batch using the same ratio of salt to water.)
Place air-lock lid on the jar tightly.. Allow to ferment (culture) for 3 days at room temperature, checking after day 2. When they are done, the beans will smell and taste “pickled”, but they should still be slightly crisp.
Remove air-lock lid and replace with storage lid — transfer to cold storage.
Makes 1-quart.

- 3/4 to 1 pound fresh green beans
- 1 large clove garlic, sliced
- pinch red pepper flakes
- 1 teaspoon dried dill
- 1 1/2 Tablespoons unrefined sea salt
- 2 cups filtered water (Or you can use the brine that we made before)
- 1-quart sized wide-mouth jar with an air-lock lid
OPTIONAL
- Pot of boiling water
- Bowl of ice water
- Pot of boiling water
- Bowl of ice water
Place half of the sliced garlic to a clean quart-sized mason jar, followed by the red pepper flakes and dill.
Snap off the stem-end of green beans. (We've done it both ways and it works either way. I go towards the less is better...so I haven't blanched the last two batches ) Blanch green beans in boiling water for 2 minutes, then immediately transfer to a bowl of ice water until no longer hot. Drain the blanched beans well and pat dry with paper towels.
Add green beans to your jar, stem-end down, packing them close together….it helps to lay the jar on its side at first. Fill the jar completely with the green beans, but do not pack them in too tight. Sprinkle remaining garlic slices on top of beans in jar.
In a bowl, or large glass measuring cup, mix together the water and salt. Pour this mixture into your jar of beans to cover, being sure to leave 1-inch space from the top of the jar for expansion. (If the brine does not cover, simply make up another batch using the same ratio of salt to water.)
Place air-lock lid on the jar tightly.. Allow to ferment (culture) for 3 days at room temperature, checking after day 2. When they are done, the beans will smell and taste “pickled”, but they should still be slightly crisp.
Remove air-lock lid and replace with storage lid — transfer to cold storage.
Makes 1-quart.
Tuesday, August 2, 2011
Running late! I need to KETCHUP!!
I will have to post the Ketchup pictures and recipe tomorrow. Had a new development in my life today, and also had to deal with almost 10 pounds of cherry tomatoes (low acid, yellow ones-YUM!)
Here's the recipe...
2 cans (6 oz each) tomato paste
2 TBSP raw apple cider vinegar
3 TBSP whey
3 to 4 TBSP Maple Syrup, to taste
1 TBSP unsulphured molasses
1 teaspoon unrefined sea salt, or more to taste
1/8 teason cayenne
1/8 ground all-spice
1/8 teaspon onion powder
1/4 ground cloves
1/4 to 1/2 filtered water (to desired consistency0
Place all aingredients, except water, in a large bowl. Whisk together. Add 1/4 cup filtered water and process until smooth. If needed, add additional water until desired consistency is reached. We used about 1/2 cup of water.
Place ketchup in yur quart glass jar, cap with the air-lock lide All to ferment, at room temperature and in the dark, for about 3 days.
Remove air-lock lid and replace with storage lid. Keep in the refrigerator for long term storage.
Makes 2 cups.

We transferred our ketchup to a cleaned plastic ketchup squeeze bottle once it was done. Here's a tip, the ketchup will keep fermenting in the fridge. If the plastic bottle is closed tight...it will be a bit blown up from the gas. Here's the tip...open it with caution with the opening towards the sink...otherwise you will be washing the ceiling...ask me how we know :)
Monday, August 1, 2011
Happy August!
Welcome to my month of "Lacto-fermented" recipes. We have been doing really well at the farmer's market in the next town over and I've been directing folks to our new website (..that I still need to get built...yikes!) www.InAPickle.homestead.com and there we are going to also be posting the recipes, so check it out (in a few days-sheepish grin). Hopefully, our new customers will come over and become new readers of the blog as well.
Our first recipe is going to be the basic pickle with the lacto-ferment process.
Lacto-fermentation is how our grandparents kept food. It was put in a salt brine and then kept in the Cold Cellar, where it never got really, really cold, or very warm. Lacto-fermented food does best stored at 50* or less. So if you have room in your refrigerator, that's perfect for storage.
What you will need:

Wide-mouth Ball (Kerr) Jar
Lacto-Ferment Trap Lid (available at the Sunbury farmer's market or online on our site)
Zipper bag-sandwich sized
Measuring Cups & Spoons
Filtered Water
Pickling Salt
Pickling Cucumbers (6-7 pickling or 20-30 small gherkins)
3-6 cloves of garlic
Dill
Whey
I didn't take pictures of all the steps(...because I am lame and forgot! You'll have to use your imagination on those)
First you are going to make your brining solution. We use a "6%" solution which is 8 cups of filtered water to 6 tablespoons of pickling salt. We have recently switched over to Himilayan Pink Salt as it is reported that it contains all 84 minerals that the body needs. For this first recipe, however, I just used regular canning/pickling salt that is readily available at the store. You can use less salt, but don't go less than about 2 Tbsp for 8 cups of water.
Also in most of the lacto-ferment recipes, it calls for whey. You can get whey from the top of your yogurt cut (plain, please) or in our case, I use kefir whey. When I am making the kefir, it naturally separates (isn't that convienent). The whey is used as a bit of a starter of the probiotic bacteria. If you don't have whey...don't worry! You can just add another tablespoon of salt to the brine.
Now, normally, you will have a LOT more cucumber slices than I do. We usually do quart sized jars. Unfortunately, the cucumbers I got from the farmer's market had already started to 'turn' and were getting a bit on the slimy side. You want to use the freshest and best produce you can. So, I have a pathetic amount of slices and used a pint jar instead.

Put your cucumbers, 2 Tbsp whey, garlic (I smash and dice one clove and then leave the others peeled but whole.), dill (about 2 Tablespoons fresh, 2 teaspoons dried--at this point the measuring spoons are mostly a decoration...use the amounts that you like) into your clean jar. You will fill the jar to about the "shoulder", or about an inch from the top. At this point you can add a grape leaf (wild is fine) or an oak leaf to help keep the pickles crisp...or you can use alum or "pickle crisp".
Pour your brine to cover your cucumbers. They will float a bit, so use your sandwich bag and put some brine in it to sink the pickles down. Some people will use marbles in a bag instead. Carefully close the bag so it doesn't have air in it.

Now, you will add your lid with the airlock fermentation trap on top. Screw on the lid so it is snug and then put the airlock firmly into the grommet. It is not going to go down very far...this is correct!

Add about 1 1/2 tablespoons of filtered water into the airlock (there is a faint line that you fill to)
 Finally you will want to keep it out of UV light. The UV will kill the fermentation process. So put it into a dark cabinet or cover the jar with a dishcloth.
 In just about 24 hour you will start to see bubbles in your brine. This will go on for about 3 days. When you tap on the side and you don't see bubbles, it is ready to get recapped and put into your cold storage. You can pour your pickles into another jar with a lid or just replace your fermentation lid with a regular wide-mouth lid (1 or 2 piece is fine).
Your pickles will get stronger over time and a bit "fizzy-ish" but not terribly so. Your nose knows. If it smells like something you wouldn't want to eat...feed it to the chickens! (Or the dog or the trash).
Lacto-fermentation generates the good bacteria that your 'gut' needs to be healthy. It's the same as eating yogurt or "Activia"tm. At first, you may experience a bit of digestional upset. Pickles are a condiment and not a "main dish" (I am not a doctor NOR do I play one on TV....) Over time, though, your body will not only adjust, but be healthier for it! (And so will your chickens and dogs!)
Tune in tomorrow for.....lacto-fermented KETCHUP! Be sure to tell me in the comments what you would like to see me make...and send your friends over to read too!!
Our first recipe is going to be the basic pickle with the lacto-ferment process.
Lacto-fermentation is how our grandparents kept food. It was put in a salt brine and then kept in the Cold Cellar, where it never got really, really cold, or very warm. Lacto-fermented food does best stored at 50* or less. So if you have room in your refrigerator, that's perfect for storage.
What you will need:

Wide-mouth Ball (Kerr) Jar
Lacto-Ferment Trap Lid (available at the Sunbury farmer's market or online on our site)
Zipper bag-sandwich sized
Measuring Cups & Spoons
Filtered Water
Pickling Salt
Pickling Cucumbers (6-7 pickling or 20-30 small gherkins)
3-6 cloves of garlic
Dill
Whey
I didn't take pictures of all the steps(...because I am lame and forgot! You'll have to use your imagination on those)
First you are going to make your brining solution. We use a "6%" solution which is 8 cups of filtered water to 6 tablespoons of pickling salt. We have recently switched over to Himilayan Pink Salt as it is reported that it contains all 84 minerals that the body needs. For this first recipe, however, I just used regular canning/pickling salt that is readily available at the store. You can use less salt, but don't go less than about 2 Tbsp for 8 cups of water.
Also in most of the lacto-ferment recipes, it calls for whey. You can get whey from the top of your yogurt cut (plain, please) or in our case, I use kefir whey. When I am making the kefir, it naturally separates (isn't that convienent). The whey is used as a bit of a starter of the probiotic bacteria. If you don't have whey...don't worry! You can just add another tablespoon of salt to the brine.
Now, normally, you will have a LOT more cucumber slices than I do. We usually do quart sized jars. Unfortunately, the cucumbers I got from the farmer's market had already started to 'turn' and were getting a bit on the slimy side. You want to use the freshest and best produce you can. So, I have a pathetic amount of slices and used a pint jar instead.

Put your cucumbers, 2 Tbsp whey, garlic (I smash and dice one clove and then leave the others peeled but whole.), dill (about 2 Tablespoons fresh, 2 teaspoons dried--at this point the measuring spoons are mostly a decoration...use the amounts that you like) into your clean jar. You will fill the jar to about the "shoulder", or about an inch from the top. At this point you can add a grape leaf (wild is fine) or an oak leaf to help keep the pickles crisp...or you can use alum or "pickle crisp".
Pour your brine to cover your cucumbers. They will float a bit, so use your sandwich bag and put some brine in it to sink the pickles down. Some people will use marbles in a bag instead. Carefully close the bag so it doesn't have air in it.

Now, you will add your lid with the airlock fermentation trap on top. Screw on the lid so it is snug and then put the airlock firmly into the grommet. It is not going to go down very far...this is correct!

Add about 1 1/2 tablespoons of filtered water into the airlock (there is a faint line that you fill to)


Your pickles will get stronger over time and a bit "fizzy-ish" but not terribly so. Your nose knows. If it smells like something you wouldn't want to eat...feed it to the chickens! (Or the dog or the trash).
Lacto-fermentation generates the good bacteria that your 'gut' needs to be healthy. It's the same as eating yogurt or "Activia"tm. At first, you may experience a bit of digestional upset. Pickles are a condiment and not a "main dish" (I am not a doctor NOR do I play one on TV....) Over time, though, your body will not only adjust, but be healthier for it! (And so will your chickens and dogs!)
Tune in tomorrow for.....lacto-fermented KETCHUP! Be sure to tell me in the comments what you would like to see me make...and send your friends over to read too!!
Subscribe to:
Posts (Atom)